Guide to Thermostatic Expansion Valves

Learn how thermostatic expansion valves work in HVAC systems.

Originally published on June 24, 2013

Understanding TXVs

Since the minimum efficiency regulation changed to 13 SEER in January 2006, most OEM systems now incorporate a thermostatic expansion valve (TXV) style metering device as the standard for air conditioning systems. It is now extremely important for the HVAC technician to understand the design and operation of this type of valve.

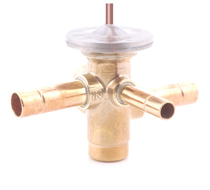
The thermostatic expansion valve (TXV) is a precision device, which is designed to regulate the rate at which liquid refrigerant flows into the evaporator. This controlled flow is necessary to maximize the efficiency of the evaporator while preventing excess liquid refrigerant from returning to the compressor (floodback).

One of the design features of the TXV is to separate the high pressure and low pressure sides of an air conditioning system. Liquid refrigerant enters the valve under high pressure via the system’s liquid line, but its pressure is reduced when the TXV limits the amount of this liquid refrigerant entering the evaporator.

Understanding the Function of the TXV

The thermostatic expansion valve controls one thing only:  the rate of flow of liquid refrigerant into the evaporator. Contrary to what you may have heard, the TXV is not designed to control:

  • Air Temperature
  • Head Pressure
  • Capacity
  • Suction Pressure
  • Humidity

Trying to use the TXV to control any of these system variables will lead to poor system performance – and possible compressor failure.

Understanding How the TXV Controls the System

As the thermostatic expansion valve regulates the rate at which liquid refrigerant flows into the evaporator, it maintains a proper supply of refrigerant by matching this flow rate against how quickly the refrigerant evaporates (boils off) in the evaporator coil. To do this, the TXV responds to two variables: the temperature of the refrigerant vapor as it leaves the evaporator (P1) and the pressure in the evaporator itself (P2). It does this by using a movable valve pin against the spring pressure (P3) to precisely control the flow of liquid refrigerant into the evaporator (P4):

TXV Pressure Balance Equation
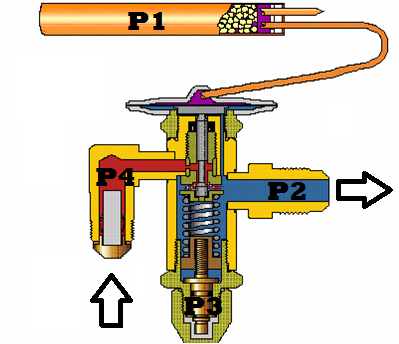
TXV
P1+P4 = P2+P3
P1 = Bulb Pressure (Opening Force)
P2 = Evaporator Pressure (Closing Force)
P3 = Superheat Spring Pressure (Closing Force)
P4 = Liquid Pressure (Opening Force)


Understanding How the TXV Transfers Energy

Here is a closer view of the TXV in operation. The valve pin restricts the flow of the liquid refrigerant. As the flow is restricted, several things happen:

  • The pressure on the liquid refrigerant drops
  • A small amount of the liquid refrigerant is converted to gas, in response to the drop in pressure
  • This “flash gas” represents a high degree of energy transfer, as the sensible heat of the refrigerant is converted to latent heat
  • The low-pressure liquid and vapor combination moves into the evaporator, where the rest of the liquid refrigerant “boils off” into its gaseous state as it absorbs heat from its surroundings.

The pressure drop that occurs in the thermostatic expansion valve is critical to the operation of the refrigeration system. As it moves through the evaporator, the low pressure liquid and gas combination continues to vaporize, absorbing heat from the system load. In order for the system to operate properly, the TXV must precisely control the flow of liquid refrigerant, in response to system conditions.

Share
print

Was this helpful?

Vote This Post Up 13,609Loading...

270 thoughts on “Guide to Thermostatic Expansion Valves

  1. Just bought a new unit, the old unit was just about to die (22yrs old) Went from a 3.5 ton to 4 ton. The new unit can’t keep up on a 93 degree day, live in TX and there will be a lot hotter days to come. The installer put in a capillary coil in the house, and didn’t put a TXV on it. When I read the manual it says DO NOT use capillary inside coil. Did I just get screwed?

  2. I have a related question, is the TXV clogged if only half of the evaporator coils are cold or do you think it the coils are clogged or both? Also, we have not had to add Freon either.

  3. Hi Scott,
    Thanks for the article. I have a 410 system and the high pressure is too high, 400. The suction pressure is only 100. I thought there was a blockage so I changed the dryer and the tx valve. On start up the high was 200 and the suction 100 and I was not getting enough sub cooling. I added some refrigerant and the high went up to 400 and the low stayed at 100. Is there a blockage in the evaporater.

    • Hi Trevor,

      It is very difficult to “real-time” diagnose a system without being at the jobsite. Without knowing the indoor load, along with outdoor temperatures and unit location, I cannot offer a recommendation based on stated pressures alone. However, I would suggest checking the outdoor coil for anything that might be disrupting air flow across the coil surface (e.g. grass clippings, dust, leaves, pollen, etc.). Cleaning the coil might help in this case as these might be reducing heat transfer. If it is not something simple like that then you might want to call a local qualified contractor for support.

      Thanks,
      Scott

  4. My unit is giving a high pressure reading which my technician thinks is due to a bad txv. He said that this is also causing the short cycling of my unit. Can you advise and tell me if he is correct?

    • Hi William,

      It is very difficult to troubleshoot a system accurately without more system information. I would suggest reading our article on Spring system maintenance (http://www.ac-heatingconnect.com/preparing-your-ac-unit-for-summer-2016/) particularly the section on condenser coil cleaning. I would suggest that you get at least 3 different contractors to inspect and quote before deciding what to do on your system. Some contractors also have fairly innovative methods which allows them to keep your cost low during repair or if replacement is really needed.

      Here is the link to a contractor locator tool of ACCA – which is a national contractor organization. http://www.acca.org/locator#sthash.8lqQQsRu.dpuf

      Thanks,
      Scott

  5. I can’t pass this up any longer. “The TXV is not designed to control the suction.”
    I’ve had very good (great), results controlling the suction pressure by first
    understanding how the valve works. Then by me controlling the suction pressure.
    I’ve had to follow behind where other technicians have bailed out because they
    could not TROUBLE SHOOT.
    That’s where I come in. I don’t have a journey man’s license. In fact I don’t have
    any kind of license. I have IMAGINATION. More Important my approach is
    different. So different that I can’t see how a valve’s opening can be any less
    than it”s rated opening. To put differently. The valve has only one opening and
    that is it’s rated opening. If the ambient is high the valve will move in the closing
    direction, but it won’t close. If the ambient is low, there’s problems. You almost
    want me to point out that a lower suction pressure underneath the diaphragm
    would open the valve. Your best bet would be to look for other means of
    controlling your head pressure. I get a lot of those problems, but I prevail.

    Well I have to leave something for the back burner. See you in the movies…

  6. Hi David,

    A few recommendations, care must be taken to assure that each distributor tube has the same length and that there is no difference in pressure drop between the tubes. Bend the tubes carefully so as not to kink the tubes or diminish the internal cross-section. Try to keep all the bends with a large, smooth radius and ideally have similar bends on every tube. Ideally, mount the distributor right at the TXV outlet. If this is not possible, use a straight piece of tubing between the TXV outlet and distributor inlet. Try to keep this as short as possible. When possible, mount the distributor in a vertical position. Downward flow is recommended but upward is also acceptable. Vertical mounting helps to assure even distribution of liquid to all the tubes. If vertical positioning is not possible, horizontal is acceptable recognizing that tubes at the top may not feed solid liquid. Distributor capacities are based on 30″ long tubes. If longer lengths are used make sure you de-rate per the distributor manufacturer.

    Hope this helps,

    Thanks,
    Scott

  7. I’ve had an issue with my compressor short cycling, (every five to ten seconds) The AC tech diagnosed the problem as needing a new compressor unit. The existing unit was a trane 4 ton, and has been replaced with a Guardian 4 ton unit. The txv was also replaced and the unit ran and produced cool air from the ducts on the day of the installation (outside temp 60F). One week later on the first hot day (86F) the new unit is also experiencing short cycling every 10 seconds or so. The indoor coil was not replaced. After the tech left on the installation day I was checking out the work when the unit was operating and noticed a hissing sound around the TXV and was able to feel a slight breeze near the brazing connection. Is there any chance this isn’t a leak? I called the tech 30 minutes after he had left and described what I was seeing and he indicated that this was normal. I’m wondering if their is an air port, or relief port on TXV’s, but haven’t seen anything like that in your description and pictures above.

    • Hi Steve,

      Most Air Conditioning systems operate above normal atmospheric pressure. The system needs to remain completely sealed in order to contain the refrigerant gas within the unit. If a leak is suspected, one method to determine the location is using a bubble solution. An inexpensive bubble solution can be made from simple dishwashing soap and water. Spread this solution on the suspect area and look carefully for “bubbles’ to be created from the difference of pressure between the system and atmospheric.

      Thanks,
      Scott

Let us know your thoughts

Your email address will not be published. Required fields are marked *